
How to use Odin
How to use Odin for flashing Samsung
How to use Odin for flashing Samsung
Mastering Odin: The Ultimate Guide to Flashing Samsung Phones
Introduction:
In this comprehensive guide, we will delve into the intricate world of Odin and explore how this powerful Samsung Flash Tool can revolutionize the way you flash your Samsung phone. Whether you're a tech aficionado or a novice, this article will equip you with the knowledge and expertise to utilize Odin effectively. So, let's dive in!
Section 1: Understanding Odin
Odin, the renowned Samsung Flash Tool, is the go-to software for flashing firmware, custom recoveries, and kernels on Samsung devices. Developed exclusively for Samsung phones, Odin provides a secure and efficient method to upgrade, downgrade, and customize your device's software.
Section 2: Preparing for Flashing
Before we embark on the flashing journey, there are a few essential steps to ensure a smooth process. Firstly, make sure to back up all your important data, as flashing may result in data loss. Secondly, download the latest version of Odin from the official Samsung website to guarantee optimal performance and compatibility. Lastly, ensure that your Samsung phone has sufficient battery power to avoid any interruptions during the flashing process.
Section 3: Step-by-Step Guide on Using Odin
Now that we have all the prerequisites in place, let's unveil the step-by-step process of using Odin to flash your Samsung phone:
Step 1: Launch Odin and Boot into Download Mode
Connect your Samsung phone to your computer using a compatible USB cable. Power off your device and then press and hold the volume down, home, and power buttons simultaneously to enter Download Mode. Once in Download Mode, open Odin on your computer.
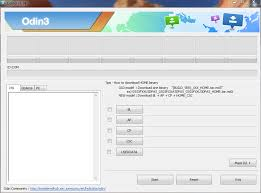
Step 2: Connect and Detect Your Device
After launching Odin, you'll notice a blue-highlighted box in the "ID:COM" section. This indicates a successful connection between your phone and computer. If the box remains gray, ensure you have installed the necessary Samsung USB drivers and try reconnecting.
Step 3: Choose the Firmware/Custom Recovery/Kernel File
Click on the "AP" button in Odin, then navigate to the location where you saved the firmware, custom recovery, or kernel file. Select the file and click "Open" to load it into Odin.
Step 4: Configure Odin Settings
Before initiating the flashing process, double-check that the "Auto Reboot" and "F. Reset Time" options in Odin are enabled. These options ensure a seamless installation and reboot of the new firmware or custom recovery.
Step 5: Begin the Flashing Process
Once you've confirmed all the necessary settings, click the "Start" button in Odin to initiate the flashing process. Odin will display a progress bar indicating the installation status. Ensure not to disconnect your phone until the process is complete.
Step 6: Completion and Reboot
Upon successful completion of the flashing process, Odin will display a "PASS" message. Your Samsung phone will then automatically reboot with the newly flashed firmware, custom recovery, or kernel in place.
Conclusion:
Congratulations! You have now mastered the art of using Odin, the Samsung Flash Tool, to flash your Samsung phone like a professional. Remember, flashing your device opens up a world of possibilities for customization and optimization. However, always exercise caution and ensure you follow the instructions meticulously to avoid any potential risks. With Odin in your arsenal, you have the power to take your Samsung experience to new heights!
Reviews / Comments (1)
Good